

Yum Yard’s Yarden Blog
Extending the Growing Season With Low Tunnels
The weather in our part of the world can be very fickle. Right now we’re coming out of the longest cold spell in recent history, but in a few days the highs are supposed to be back in the 50’s! For the most part, gardening in the KC area doesn’t begin until mid-late march at the earliest due to the high likelihood of cold temperatures, frost, and even snow. However, we can get a serious jump start on the weather by using spunbonded polyethylene fabric to make a low tunnel of protection….we call them SALAD CHUTES!
Low tunnel installation and use is included in all three levels of our gardening service. The fabric these tunnels are made of is pretty tough and can be used over again for several seasons. If a hole or tear appears, a piece of white duct tape makes the repair quick and easy. Your Yardener will collect the tunnel fabric and materials after danger of frosts and freezes have passed so that you can admire the cornucopia of salad crops that are ready to grace your table.
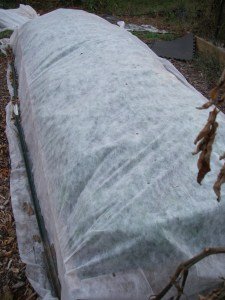
This white fabric is held up by supports of wire frame and string and covers your whole spring bed. The fabric allows about 80% of the sunlight to penetrate and allows water from rain or a watering can to flow right through. It protects your tender spring veggie plants from harsh winds, frosts, and temperatures in the low 20’s. It also does an amazing job of keeping squirrels, birds, deer, and weed seeds from entering your garden. With this tool, planting can begin as early as the first week of March.
We’ll install the tunnel when we plant your spring garden and the tunnel should stay in place until at least mid-April. You can temporarily remove it to harvest your veggies or do some weeding, but it should be put back in place as soon as you’re done. When the plants in the tunnel grow bigger, they can touch the fabric with no ill effects to them.
Pollination Information

Plants that produce fruits, must first produce flowers. Those flowers are amazing structures that can be male, female, or perfect (both make and female). The male flowers contain the sperm cells called pollen. The female flowers contain the egg cells. Perfect flowers have both pollen and egg cells within.
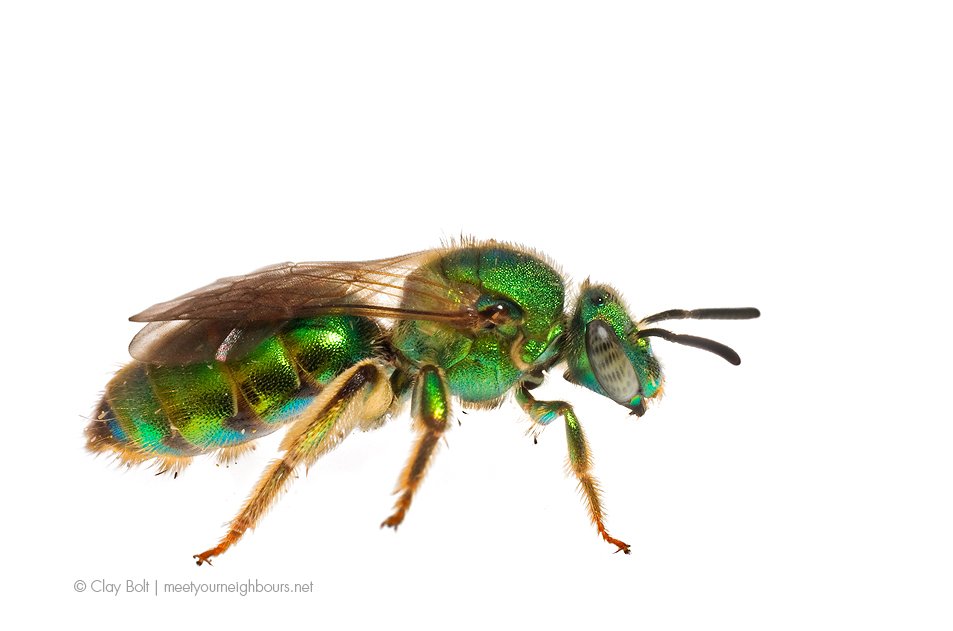
Pollen can be moved to the egg cells in many different ways. Honeybees get all the publicity as they are very visible. However, honeybees are actually not native to the U.S.A and are not necessary for pollination of most plant species. The tiny metallic ground bees, carpenter bees, bumblebees, and many wasps are actually more important for plant pollination. If you see these green, yellow, black and blue beautiful insects buzzing around your garden you’re likely going to have a great harvest!
Plants in the Curcurbit family (cucumbers, squash, and melons) begin by producing only male flowers to attract pollinators and get them to visit the plant regularly. Then they produce both male and female flowers, The female flowers will have a slight bulge at the base and this will in turn become the fruit.

Tomatoes, peppers, eggplant, and beans have perfect flowers and do not need bees to pollinate their fruit. Sometimes bees to get involved though and if you save seeds from those fruits and plant them, you may get a different type of plant next year. Contrary to popular belief, planting peppers next to tomatoes or other plants does not make the fruit from them spicy. The DNA for the fruit this year is already set in the seed collected last year.
Most tomato flowers are pollinated before the flower even opens up. When the plant is shaken by the wind, the pollen falls on the egg and a fruit is set. If the wind doesn’t blow, you can expedite the process by giving your plants a gentle shake or using a vibrating tool such as an electric toothbrush to get the pollen inside the flowers moving.
Pollen is fairly delicate and doesn’t handle the heat well. If we get days in the mid-upper 90’s or higher, the pollen will die and it’s all but impossible to get fruit to set in these conditions. Once it cools back down a bit, the plant will again be able to bear fruit.
Harvesting Tips and Weeds
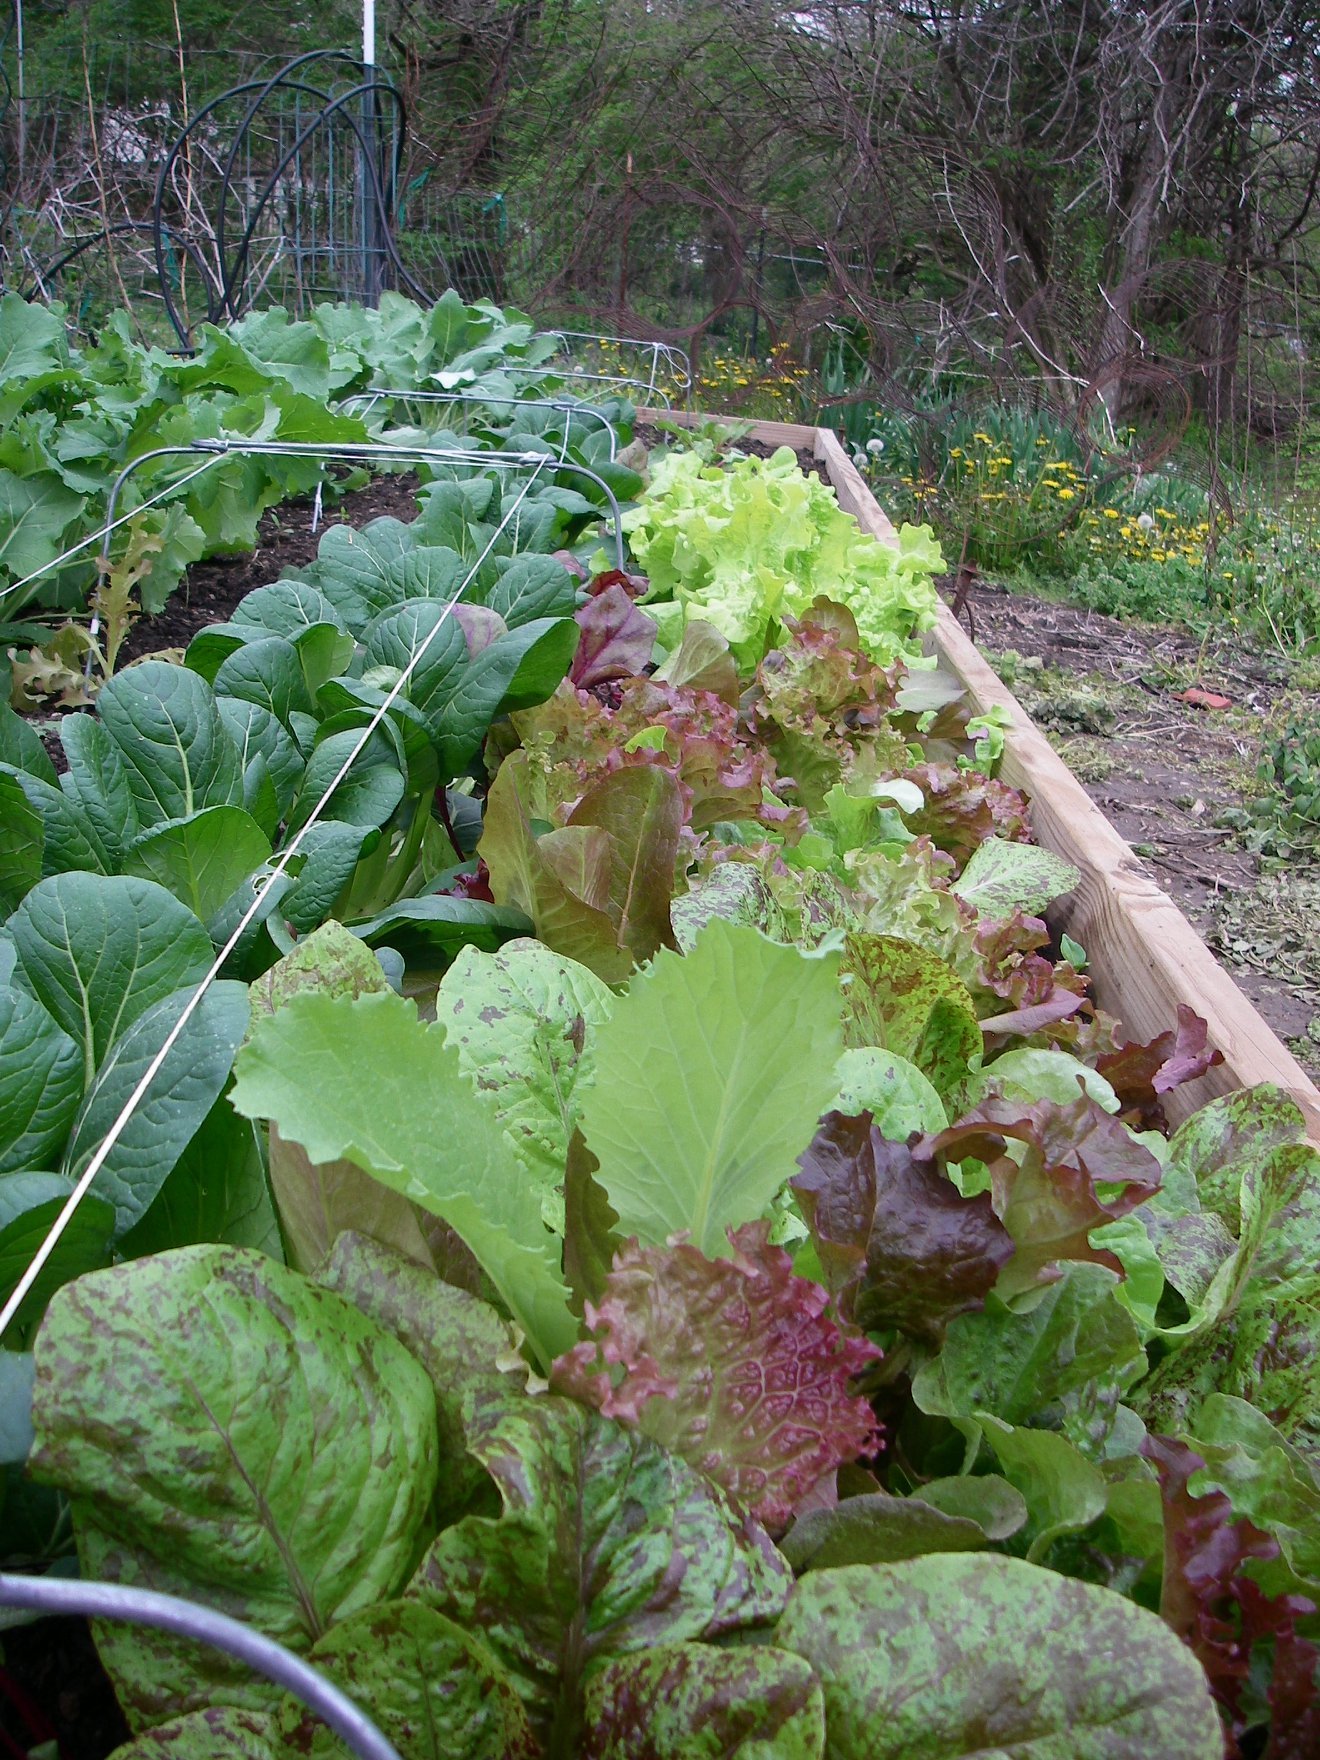
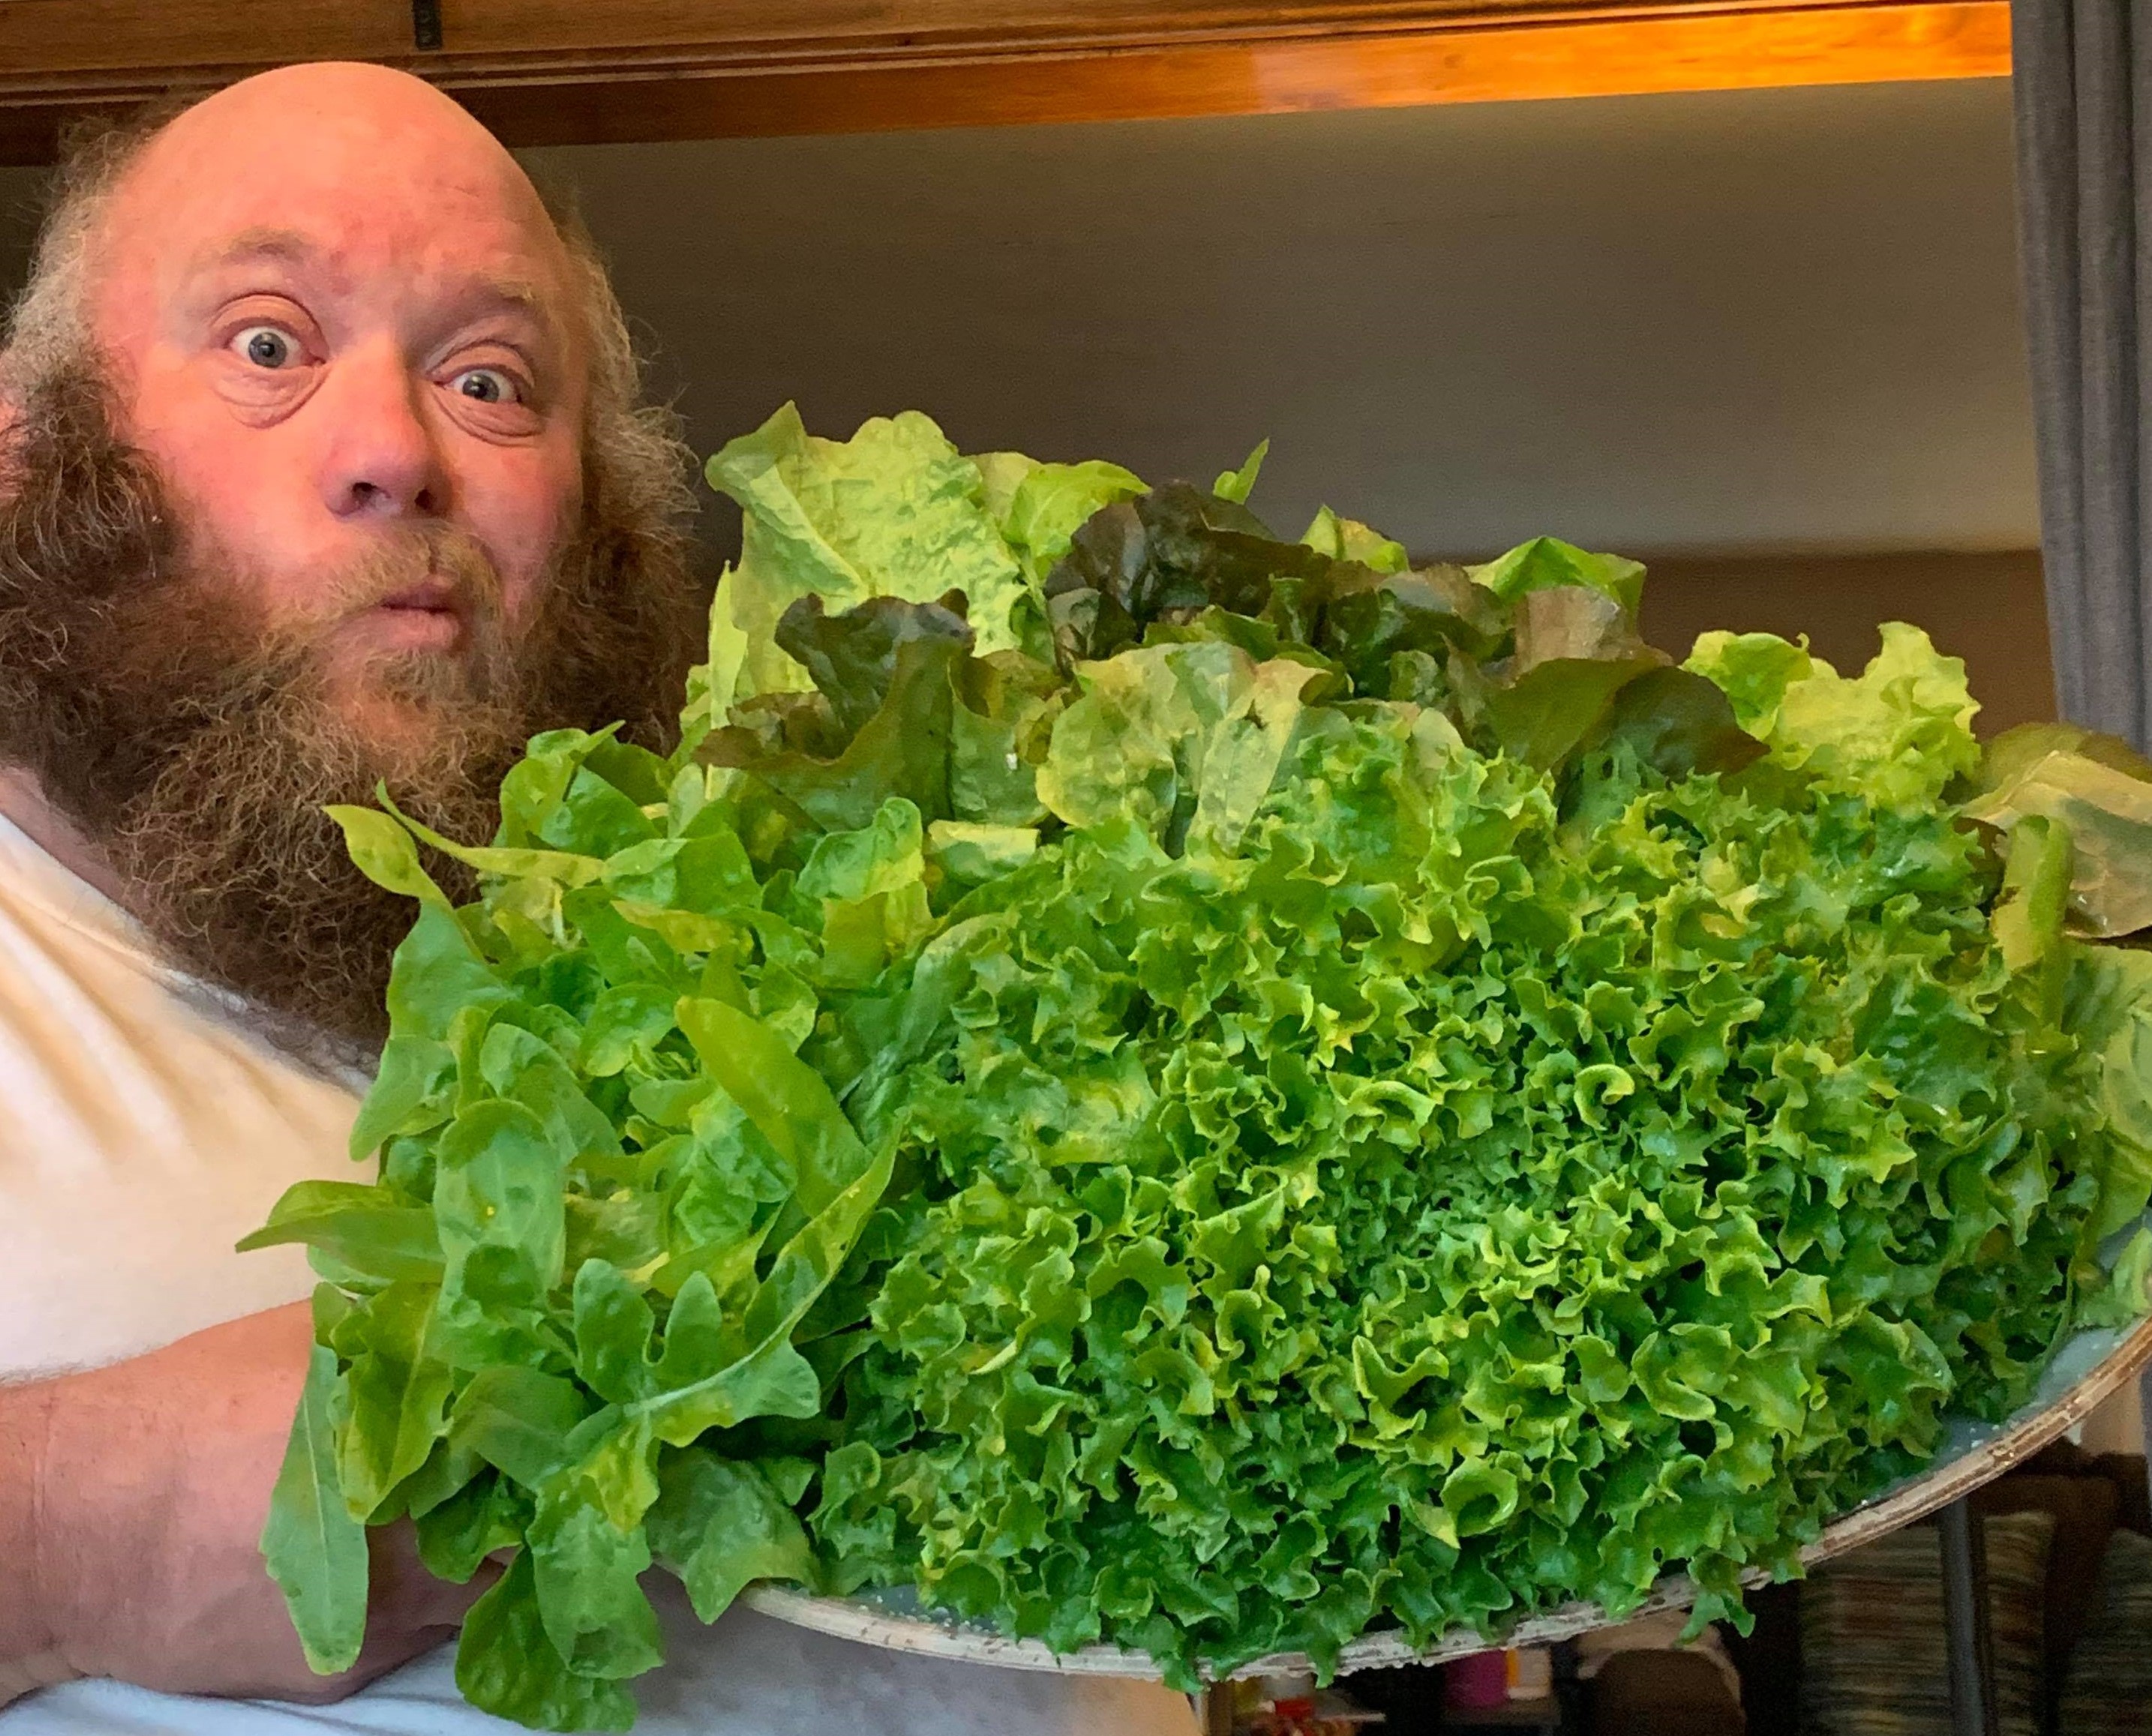
Hopefully everyone that had spring crops got their fill of salads with lettuces, radishes, green onions, kohlrabi, broccoli, and many more. Sadly…those crops only do well in cool weather and we’re definitely past that!
For those of you on my Complete Seasonal Gardening Service, with each of my visits, I do my best to rid your gardens of as many unwanted weeds as I can, but they grow fast and need to be removed as soon as possible so that your vegetable plants aren’t competing with them for nutrients, sunlight, and water. As you peruse your gardens, it’s always a good idea to pull weeds as you see them. If you’re not sure what a weed is…it’s basically any plant that’s not supposed to be there. Look for plants that are not like the others in a row or are growing right at the edges of your beds. Weeds are easiest to pull when the soil is damp. When you pull them, it’s perfectly fine to leave them on the ground next to your vegetables…the dead weeds act as a mulch!
Several vegetables are ready or almost ready to harvest and I want to make sure you harvest your vegetables at their peak of flavor and texture. The following is a list of veggies you might have growing and when/how to harvest them.
- Kohlrabi-look for bulbs that are the size of your fist or smaller. Pull them up by the roots and snip off the tough root with some shears.
- Beets–The root typically starts to show above the surface of the soil….you can harvest them at any size, but it’s best to wait until they get at least the size of a ping pong ball
- Carrots–these delicious roots grow very slowly, but should be getting close to harvest this month. You’ll need to gently move the soil away from the plant to see the top of the carrot. Then you can judge whether or not you want to pull it.
- Kale— snip off the lower leaves all summer and fall. The plant will make a long stalk with new leaves growing. Avoid breaking off the growing tip or taking too many leaves at a time.
- Swiss Chard–Harvest a few leaves fro each plant at a time. This plant will produce all summer long.
- Onions–Harvest at any time you would like. Once the tops fall over, it’s time to pull them completely though.
- Herbs–Basil, Papalo, thyme, oregano, and others can be harvested whenever you please. Just take a few leaves off to season your summer dishes. Try not to take more than 1/3 of the plant’s leaves at a time though. If your basil starts to flower, pinch off the flowers as soon as possible so that the plant focuses on making leaves instead of flowers and seeds.
- Squash and cucumbers–these are truly at their best when picked small. Letting them get too large will make for tougher skin and bigger seed. Just twist the fruit with your hands or snip off the stem. be careful not to break the branches when harvesting as these plants will produce all summer long.
- Cantaloupe–their scent will let you know when to harvest. Give them a sniff and if they smell strongly of cantaloupe, they are ripe.
- Beans and Okra–These plants produce fruit FAST! Harvesting daily or at the most every other day is essential. Letting beans or okra pods get too big will lead to tough, fibrous fruit that is almost inedible. Pull the beans off by hand and snip the okra off with some shears…be mindful of the prickly spines!
- Eggplant–Harvest at any stage you wish….don’t let them get too big though or they will be tough and full of seeds.
- Peppers–Most all peppers start as some shade of green. Leaving them on the plant longer will allow them to show their true colors and flavors as well. Some peppers should be harvested green…shishitos and serranos are two that are best picked green.
- Tomatoes–pick them as soon as they start to change to any color other than bright green. We call this “picking at first blush.” Once a tomato starts to change color, the plant is done with it and nothing good will come from leaving it on the vine any longer. Bring your fruit in the house and place them stem side down on the counter or on a platter. Do not put them in the refrigerator! Keep an eye on them and they will ripen in a few days.
High Quality H2O!
Now that our summer crops are planted, it is time to think about watering your garden properly. What is “proper watering”? That’s a tough one to define actually. So many factors go into watering your garden and you need to consider most of them before turning on a hose.
Mother Nature sometimes provides all the water your plants need. The only way to know how much rain you’ve had is to have some sort of a rain gauge near your garden. I’m the world’s worst at maintaining a rain gauge, so I use our dog’s food bowls on our deck as a measure of how much rain we’ve had! There are many commercial rain gauges out there from the simple tube type all the way up to bluetooth enabled gauges that send the data to your phone. A general rule of thumb is a garden should get 1-2 inches of water per week. If it’s been a few days since you’ve had that much rain, it’s time to water!
While springtime crops such as lettuces and radishes love to be watered daily and kept very wet, summer crops need deeper, less frequent watering and watering of the soil, not the foliage. Yes, rain gets your plant leaves wet, but when you water your garden you should avoid watering with a spray nozzle or a sprinkler. A drip irrigation system is by far the most efficient and precise way to water, but a garden hose can work as well. Watering the leaves of summer veggies is a recipe for disease disaster! Septoria, Fusarium, blight, powdery mildew, and many other plant diseases will run rampant in a garden that says damp.
It is always best to water your garden in the morning hours. This allows any water that may splash up on the lease to dry quickly. Watering in the evening will leave plants damp all night long and may encourage moisture loving snails and slugs to hang out in your garden and munch on your plants.
If you are growing in a raised bed or in the ground with quality soil, then watering every 5-7 days is sufficient. Direct a steady, slow flow from your hose directly under the plants if you are hand watering. Run your drip irrigation system for an hour or two if you have one installed. The soil should be fully saturated and the water allowed to soak deep down into the lower reaches of the soil. This will encourage plants to send down deep roots and make them less dependent on watering in the heat of the summer.
If you are growing in containers, then watering more frequently is definitely needed. Watering daily may be necessary in the hot and windy days of summer…even twice a day in the most extreme weather. Never let your container soil completely dry out as this will stress the plant and result in far less yield and lower quality produce. Water them in the early morning hours, then again in mid-afternoon if necessary.
If you check on your garden on a hot, sunny day and your plants look droopy, do not worry. This is their way of conserving water in their leaves. Go out later in the evening and they should have bounced back. If for some reason, they haven’t bounced back by the evening hours, then they could use a good watering.
Tomato plants grown in raised beds or in the ground require far less water than the other summer veggies. A tomato plant’s ancestors were grown in the desert and adapted to living in dry conditions. A deep watering of tomato plants every 7-10 days is sufficient. Starving plants for water again forces them to send down deeper roots to tap into sub-soil moisture. Many growers “dry farm” their tomatoes and do not water them at all after the initial watering right after planting. A tomato plant that has not been over-watered tends to have less disease issues and actually has better flavored fruit!
- Water the roots. No matter what method you are using, avoid spraying down your plants with a sprinkler. Wet leaves are havens for fungal diseases and slugs. I use drip irrigation to accomplish this, but you can use soaker hoses or a simple watering can…just keep the water on the ground…not on the leaves.
- Water deeply. It’s much better to deeply water once or twice a week during hot and dry weather than it is to water them a little each day. Let your plants dry out thoroughly between waterings. Poke your finger into the soil and if it feels damp or moist…don’t water.
- Water evenly. Try to maintain a level of soil moisture that doesn’t fluctuate greatly. Using mulch of any kind is a great way to maintain moisture stability. Plants that dry out too much and then get water logged tend to get Blossom End Rot…a condition caused by lack of calcium. Stressing the plant by uneven watering keeps it from absorbing calcium and you could lose fruit to BER.
- Water in the morning. If your schedule allows it, water your plants in the morning…this gives plants and the surface of the soil time to dry out during the day and will discourage slugs and pill bugs that like to come out at night and hang out around wet soil. If you have to water in the evening, it’s ok, but make sure you don’t get those leaves wet!
- Use good water. If possible, avoid watering plants with cold water from the hose. The temperature change isn’t good for the plants and city water tends to have chlorine and other chemicals in it that aren’t that great for your soil. Rain barrels are the best option, but putting city water in a watering can or empty milk jugs and letting it sit for 12 hours or so brings it up to temperature and allows some of the chemicals to evaporate.
Soil…only the best should be in your gardens!

The most important ingredient when creating a great vegetable garden is quality soil. Without quality soil your plants’s roots will not have proper access to nutrients, water, and air. So what is quality soil? The answer is fairly simple, but not easy to create.
I build all of my soil with fully composted yard waste. When people recycle their raked leaves in the fall and tree services send their wood chips to a composting company, they put all of this in giant piles and let nature and science take its course. It’s a complex process, but basically as the dead plants rot, they create gasses and chemicals that break them down into tiny particles that are easy for living plants to absorb This process generates a lot of heat and literally cooks any weed seeds, diseases, fungus, or other nastiness to the point where the resulting product is safe for your plants to grow in. Quality compost it a deep black color, crumbly with almost no visible pieces of sticks or bark, and should smell sweet and Earthy. If you’ve ever raked up some old leaves in a corner of your yard and smelled the soil at the bottom, you know the smell I’m talking about! Quality compost should no longer generate heat, should not steam, and should definitely not stink! Do not put bad compost in your gardens!

Quality garden soil should be light and fluffy, but not too light and fluffy. If the soil is too fluffy, your plants’ roots will have a tough time holding on in high winds. Fluffy soil has room for air so the roots can breathe even when heavy rains dampen the soil heavily. Soils with lots of clay are far from fluffy and have no room for air when they are wet. Making sure there is no heavy clay in your soil is a tough thing to do in our area, so using raised beds and filling them with quality compost is the best way to avoid clay. Adding perlite to compost is a great way to add some air to the soil as well. Perlite is basically a super heated volcanic rock that is super light and full of tiny air pockets. These little white, airy rocks are great to add to your soil to maintain it’s fluffiness for years.

Raised beds filled with compost tend to dry out very quickly causing stress to your plants. Adding a mineral called vermiculite is a great way to keep your soil at a consistent moisture level This copper/gold colored mineral really makes your soil’s structure consistent to the touch. Vermiculite retains moisture and keeps it readily available to your plants’ roots when they need it.

Peat moss is a great additive to compost as well. Peat has a low pH and will offset the alkalinity of compost a bit. Most vegetables love a slightly acidic soil and peat moss helps to achieve this. Peat also helps to retain water similarly to vermiculite. You can use a lot of peat in your soil mix, but I prefer to use it fairly sparingly.

Now that we know what’s in good soil, how do we go about creating it? Well you can buy it pre-made in the form of “potting soil” in large bags at the local garden centers. Avoid potting soils with added fertilizers or other moisture retaining chemicals. Potting soil is excellent to use, but very expensive if you need large quantities. If you are only filling a few pots to grow vegetables in, you’r better off buying pre-made potting soil.

If you need a large quantity of quality soil, you’re best to make your own. Order quality compost from a reputable company. Visit the compost facility if you can to inspect the product before purchasing it. Pick up a handful and inspect it…smell it! If it’s like I described…buy it! Place a tarp in your truck or your trailer to make cleaning it up easier and have them load up your vehicle. If you don’t have a truck or trailer or need a very large quantity of compost, have them deliver it to your home. Place a large tarp on the ground before they dump the compost to make it easier to clean up.
Now get a wheelbarrow or heavy duty sled or other large container to shovel the compost into so you can move it to your beds. For every 8 shovels full of compost, add one shovel full of perlite, one shovel full of vermiculite, and one shovel of peat moss. This 8-1-1-1 ratio has worked for me as a vegetable gardener for many years.
Once your beds are filled and have gone through one growing season, the soil level will decrease a little. Just top off with fresh compost the first couple of years. After a couple of years you’ll want to work in more of the perlite, vermiculite, and peat if you’re not getting the healthy plant growth and yields of vegetables you desire.
One note…NEVER STEP IN YOUR NEW SOIL! Make sure your raised beds are no more than 4 feet in width so you can easily reach the middle without stepping in the soil. Stepping in your beautiful soil will compact it down and make it tougher for plants to send roots through it.
Building quality soil is not easy and is definitely not cheap, but growing in poor quality soil will cost you more in the long run. Spend the money now and harvest the rewards for years!

Yes it’s cold outside, yes it is still technically winter, but it’s time to plant those gardens! One of the biggest mistakes gardeners make is planting at the wrong times. Whether you plant summer crops too early or spring crops too late, you’re headed for disaster!
Vegetables like lettuces, peas, radishes, carrots, kohlrabi, kale, beets, broccoli, and Asian greens love cool weather and are at their tastiest and most nutritious when grown before the heat of late spring and summer arrives. The problem with planting in early to mid-March is that we have hard frosts, freezes, and high winds that are tough on tender crops. These crops must be protected with a covering of some sort.

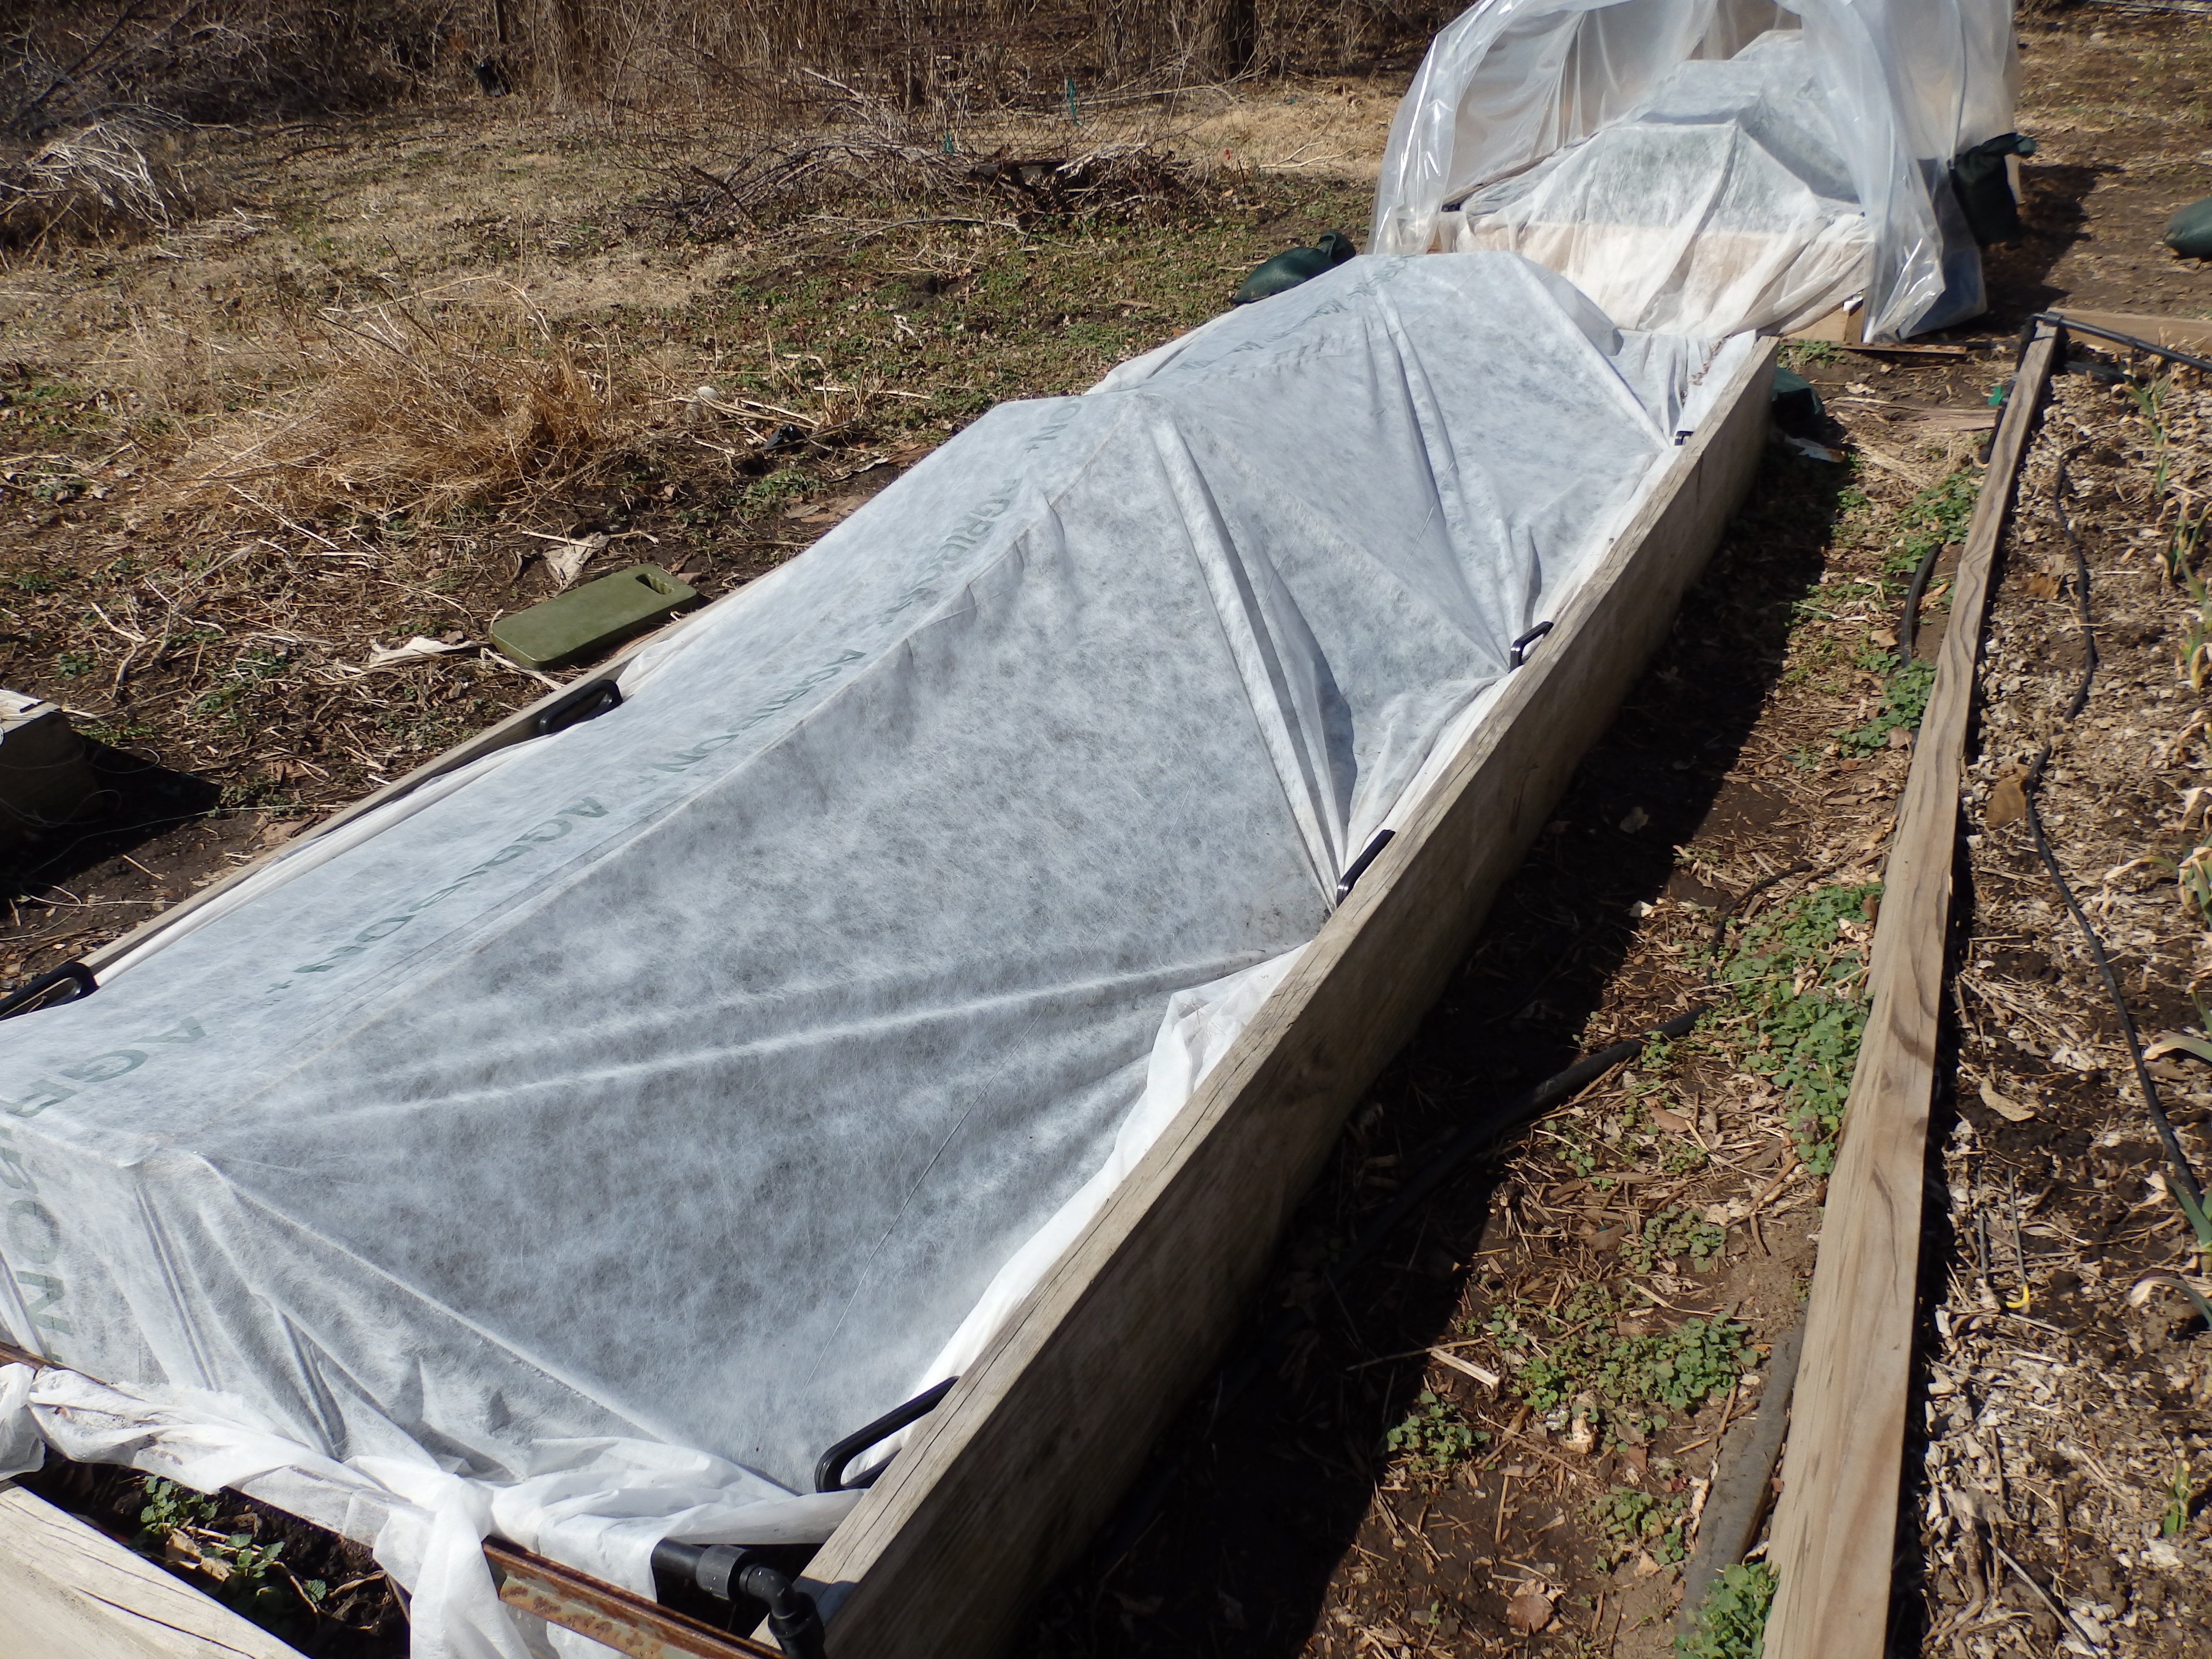
The most efficient cover to protect these lovely, tender veggies is a non-woven, spun bond polypropylene fabric. Known by the brand names of Agribon or Reemay, these covers allow most sunlight and water to pass through while blocking wind and frost and insulating plants from sub-freezing conditions. In my experience, a well covered bed of spring vegetables can withstand temperatures in the low 20’s easily. These fabrics are far superior to plastic as they insulate and protect while not allowing too much heat to build up which can kill tiny plants quickly.
The fabric is supported by a light, portable framework of “hoop loops” and some light twine. You can anchor the sides down with garden staples, plastic anchors, rocks, or any other heavy object. The key is to leave no major gaps so the squirrels and rabbits can’t get inside and have a salad buffet!
This video is one I took in my own gardens a few years ago that shows you just how amazing these row covers are. The video was taken in early April with the plants being started in early March.
The window to plant these delicious vegetables opens next week! If your garden isn’t ready, there is still time to have us renovate it with fresh compost. If you don’t have a garden, there is still time for us to build one for you. If you’re not sure how to manage a garden, but want the joys and convenience of having fresh produce in your backyard, then we are at your service! E-mail us for a free consultation and let us grow for you! yumyards@gmail.com